Apache Guacamole(鳄梨酱)是一个基于HTML5 Web应用程序,可以随时通过浏览器连接已经配置好的机器,它支持标准协议,例如VNC、RDP和SSH。
部分内容参考于官方文档:https://guacamole.apache.org/doc/gug/index.html
Apache Guacamole分为服务端和客户端,均在同一服务器上部署,本文基于CentOS7进行搭建。
Guacamole服务端安装
1、安装所需依赖
yum install cairo-devel libjpeg-turbo-devel libjpeg-devel libpng-devel uuid-devel wget gcc gcc-c++2、安装可选依赖(可选)
可选依赖项说明
VNC支持需要libvncclient,该库是libvncserver包提供
RDP支持需要freerdp,如果是centos7需要安装freerdp1.2-devel包
SSH支持需要libssh2、openssl、pango
Telnet支持需要libtelnet、pango
VNC音频支持需要pulseaudio-libs-devel
libvorbis提供对Ogg Vorbis的支持,如果安装libguac将Ogg Vorbis的支持
libwebp被libguac用来编写WebP图像,尽管Guacamole协议没有强制要求对WebP的支持,但是如果浏览器和libguac都支持WebP图像,则将使用WebP图像
guacamole-server提供的guacenc程序,将屏幕录制的内容转换为视频,该程序依赖于FFmpeg
默认Centos没有FFmpeg软件包,我这里需要借助第三方的yum源
yum install http://li.nux.ro/download/nux/dextop/el7/x86_64/nux-dextop-release-0-5.el7.nux.noarch.rpm
yum install ffmpeg-devel
yum install libvncserver-devel freerdp1.2-devel libssh2-devel openssl-devel pango-devel libtelnet-devel pulseaudio-libs-devel libvorbis-devel libwebp-devel
3、下载guacamole-server
cd /usr/local/src
wget https://mirrors.tuna.tsinghua.edu.cn/apache/guacamole/1.0.0/source/guacamole-server-1.0.0.tar.gz
4、编译guacamole-server
tar xf guacamole-server-1.0.0.tar.gz
cd guacamole-server-1.0.0
./configure --with-init-dir=/etc/init.d
运行完毕后正常会看到如下内容
......
guacamole-server version 1.0.0
------------------------------------------------

   Library status:

     freerdp ............. yes
     pango ............... yes
     libavcodec .......... yes
     libavutil ........... yes
     libssh2 ............. yes
     libssl .............. yes
     libswscale .......... yes
     libtelnet ........... yes
     libVNCServer ........ yes
     libvorbis ........... yes
     libpulse ............ yes
     libwebp ............. yes
     wsock32 ............. no

   Protocol support:

      RDP ....... yes
      SSH ....... yes
      Telnet .... yes
      VNC ....... yes

   Services / tools:

      guacd ...... yes
      guacenc .... yes
      guaclog .... yes

   Init scripts: /etc/init.d
   Systemd units: no

Type "make" to compile guacamole-server.
继续进行编译安装
make
make install
ldconfig
5、启动Guacamole服务
/etc/init.d/guacd start启动后默认会开启4822端口
Guacamole客户端安装
1、安装jdk
rpm -ivh http://mirrors.wlnmp.com/centos/wlnmp-release-centos.noarch.rpm
yum install jdk1.8
官方已经提供了打包好的war包,可以直接下载使用(如果你不嫌麻烦就自己去mvn打包)
2、下载tomcat
可以去tomcat官网下载,也可以直接通过yum来安装,CentOS7上默认yum安装的版本是tomcat7。
我这里提供两种方式(任选其一),建议使用yum方式安装,方便!
- yum方式tomcat7
 yum install tomcat
cd /usr/share/tomcat/webapps
下载Guacamole官方打包好的war包
wget https://mirrors.tuna.tsinghua.edu.cn/apache/guacamole/1.0.0/binary/guacamole-1.0.0.war启动tomcat
systemctl start tomcat- tomcat8方式
随着tomcat版本更新,该下载地址可能随时失效
mkdir /data
wget https://mirrors.tuna.tsinghua.edu.cn/apache/tomcat/tomcat-8/v8.5.47/bin/apache-tomcat-8.5.47.tar.gz
tar xf apache-tomcat-8.5.47.tar.gz
rm -rf /data/apache-tomcat-8.5.47/webapps/*
cd /data/apache-tomcat-8.5.47/webapps
下载Guacamole官方打包好的war包
wget https://mirrors.tuna.tsinghua.edu.cn/apache/guacamole/1.0.0/binary/guacamole-1.0.0.war
mv guacamole-1.0.0.war guacamole.war
启动tomcat
/data/apache-tomcat-8.5.47/bin/startup.sh3、配置Guacamole-client
Guacamole默认认证方式由user-mapping.xml配置决定,当然你也可以通过数据库、LDAP等其他更复杂的方式进行验证,此处不深入探讨
默认配置目录在/etc/guacamole,该目录需要手动创建
mkdir /etc/guacamole创建guacamole.properties文件
vi /etc/guacamole/guacamole.properties内容如下
# Hostname and port of guacamole proxy
guacd-hostname: localhost
guacd-port: 4822
enable-clipboard-integration: true
创建user-mapping.xml文件
vi /etc/guacamole/user-mapping.xml内容如下,其中username="admin" password="blog.whsir.com"为浏览器登陆时的账号密码,rdp1是一个内网的windows主机,ssh1是一个内网的centos主机,white-black指ssh终端是黑底白字的,其他账号密码端口什么的你应该看得懂,此处只是为了快速演示用,过多参数详细说明暂且不提。
<user-mapping>
<authorize username="admin" password="blog.whsir.com" >
<connection name="rdp1">
<protocol>rdp</protocol>
<param name="hostname">192.168.1.199</param>
<param name="port">3389</param>
<param name="username">user1</param>
<param name="password">12345678</param>
</connection>
<connection name="ssh1">
<protocol>ssh</protocol>
<param name="hostname">192.168.1.106</param>
<param name="port">22</param>
<param name="username">root</param>
<param name="password">blog.whsir.com</param>
<param name="color-scheme">white-black</param>
<param name="enable-sftp">true</param>
</connection>
</authorize>
</user-mapping>
4、重启tomcat登陆验证
我这里是以yum安装的,重启tomcat命令
systemctl restart tomcat访问
http://192.168.1.139:8080/guacamole/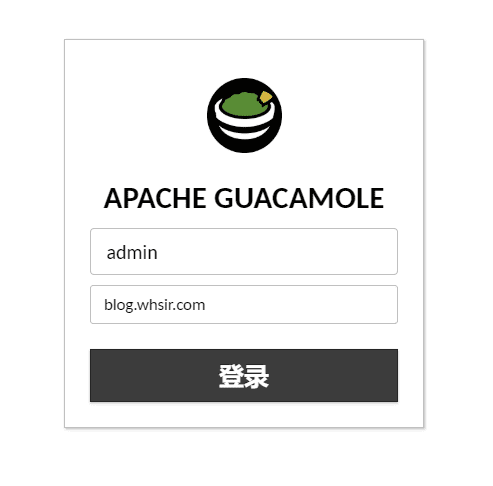
用户名admin
密码blog.whsir.com
至此一个基础的Guacamole配置完成,具体配置参数相关说明会在后续文章中说明
